📖 Technical Information
Knowledge Base: KB-002
Category: Prosthetics
Difficulty: Basics to Advanced
Reading time: approx. 20 minutes
Author: Tom DoManh – SFX Artist & Prosthetic Designer
Last updated: June 2026
Related services: Character Development · Film Prosthetics · Mould-Making · On-Set SFX
Related projects: Knabe Mix · Old Age · Alien
Prior knowledge: KB-001 – What are silicone prosthetics?
🟢 Cornerstone Article
This article is one of the most important fundamentals of the DoManh SFX Knowledge Base and describes the complete workflow of professional film prosthetics – from the first idea to the finished character transformation.
Table of Contents
Why every film prosthetic begins with an idea
Concept development and references
Character design
Production planning
The key takeaways from Part 1
(Further chapters follow in Parts 2–4.)
Why every film prosthetic begins with an idea
When audiences see a convincing character transformation on screen, few think of the long development process behind it. In fact, a professional film prosthetic doesn’t start with silicone, mould-making or modelling clay – but with an idea.
Every production pursues a specific goal. A character should appear older, a creature should seem believable, or an injury should tell a story. Before the first material is worked, it must therefore be clear what effect is to be achieved later on.
This conceptual phase shapes the entire remaining workflow. It determines which materials are used, how extensive the mould-making will be, and which requirements the later application must meet.
📷 Recommended image
knabe-mix-body-prosthetic-finished-sfxmakeup.jpg
Caption
Fig. 2: Behind every finished character transformation stands a clearly defined creative process.
💡 Note
A convincing film prosthetic doesn’t begin in the workshop, but with a clear vision of the story the character is meant to tell.
Concept development and references
After the first conversations with the production or client, the research phase begins. Reference images, anatomical studies, mood boards or existing character designs help to establish a shared creative direction.
This is not about copying existing designs. Rather, references serve as visual orientation to better understand proportions, skin structures, ageing features or creative styles.
Especially with bespoke projects, the final design often develops step by step. Sketches, digital drafts or first modelling studies help to test ideas early on and develop them further together with the production.
📷 Recommended image
➡️ If available:
Concept drawing Knabe Mix
If not available:
vampire-prosthetics-sculpt.jpg
Caption
Fig. 3: First drafts and modelling studies help to plan the later character development.
Character design
Only once the creative direction is set does the actual character development begin.
Here it is decided:
Which areas of the face are altered.
Which anatomy is built up.
Which skin structures should be visible later.
What range of movement is required.
Which areas are captured in close-up by the camera.
Good character development therefore considers not only the look, but also technical requirements such as facial expression, wearing comfort or production conditions.
💡 Practical tip from DoManh SFX
A prosthetic should never just look spectacular. What matters is that it supports the character and fits believably into their story. Small, deliberately placed changes often work more convincingly than overloaded designs.
📷 Recommended image
old-age-man-prosthetics-make-up.png
Caption
Fig. 4: Even small anatomical changes can significantly alter the impact of a character.
Production planning
Before the actual mould-making begins, the entire manufacturing process is planned.
Among others, the following questions play a role:
How much time is available before the shoot?
Are several identical prosthetics required?
Must the prosthetic survive several shooting days?
Are spare parts needed?
Which steps can be carried out in parallel?
Careful planning ensures that material orders, mould-making and later application mesh smoothly.
Especially on larger productions, this organisation is an essential part of professional project work.
📦 Project example
Knabe Mix
For the Knabe Mix project, it had to be established before modelling even began which areas of the upper body were to be altered and which movements had to be possible during the shoot. These decisions influenced both the sculpting and the later mould-making and material choice.
➡️ View project: Knabe Mix
From performer to working model
Once concept, character design and production planning are complete, the actual execution begins. In this phase, the foundation is created on which every film prosthetic is later built.
The goal is not the finished prosthetic straight away, but first the most precise possible working base. The more accurate it is, the more cleanly all subsequent steps can be carried out.
Lifecasting – the foundation of a perfectly fitting prosthetic
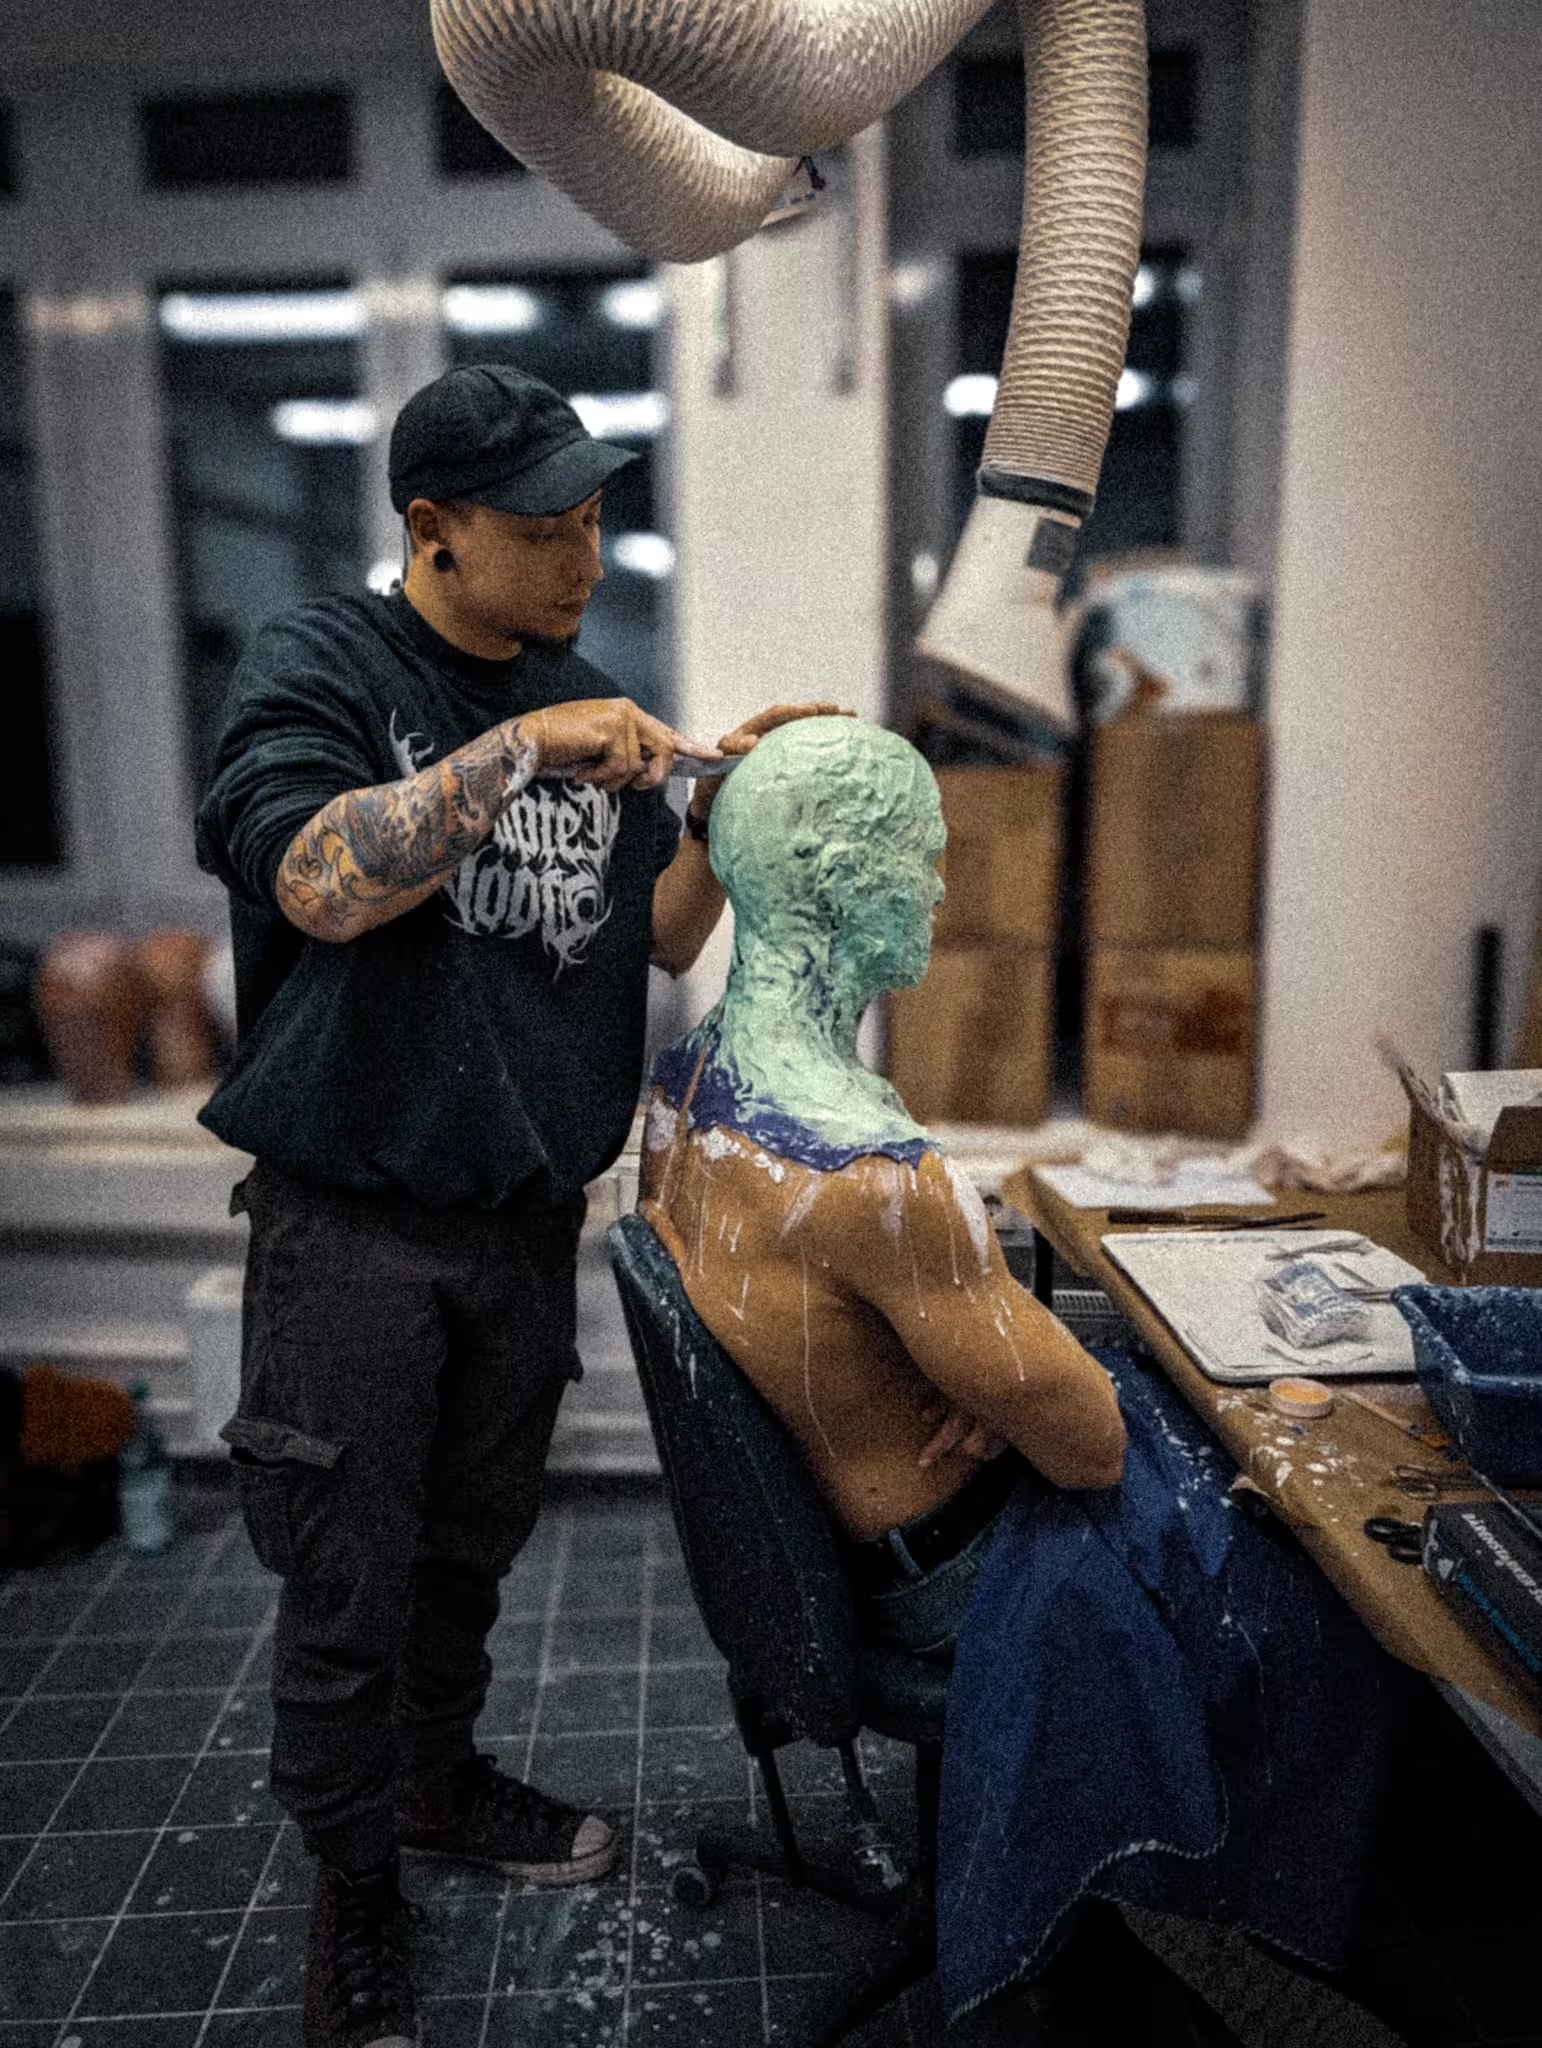
For many bespoke character projects, a lifecast forms the starting point. An exact impression of the face or a body area is created, which later serves as the basis for modelling.
A clean lifecast makes it possible to account precisely for anatomical particularities and to develop prosthetics that fit as harmoniously as possible into the performer’s natural form.
Depending on the project, different methods are used today. Alongside classic moulding techniques, many productions now also work with digital 3D scans. Which method is chosen depends, among other things, on budget, schedule and the requirements of the project.
💡 Note
A precise working model often saves time in the following production steps and reduces later adjustments during the fitting.
📷 Recommended image
No suitable lifecast image is currently available in the media library.
➡️ We will add this chapter later with a dedicated lifecast project.
The positive model – the working surface for the character
A positive model is then created from the lifecast or the digital scan. It forms the basis for all modelling work.
All anatomical changes are later built up on this model. At the same time, it serves as a reference to check proportions, symmetry and transitions at any time.
Depending on the production workflow, different materials or digital models are used for this. What matters is that the positive model reproduces the anatomy as exactly as possible and is stable enough for the following steps.
📦 Did you know?
Many viewers later see only the finished prosthetic. In reality, however, a large part of the actual work happens long before any silicone is even processed.
Sculpting – when the character takes shape
Now the creative part of the workflow begins.
During sculpting, all the anatomical changes that define the later character are modelled.
These include, for example:
ageing features
more pronounced bone structures
scars
fantasy elements
creature features
skin textures
This is already where it is decided how believable the later character will appear. Anatomical understanding, proportions and fine surface details play just as large a role as the creative idea itself.
📷 Recommended image
vampire-prosthetics-sculpt.jpg
ALT text
Hand-sculpted sculpt of a vampire prosthetic as the basis for the later mould-making.
Caption
Fig. 5: During sculpting, all anatomical changes and skin details of the later character are created.
💡 Practical tip from DoManh SFX
When sculpting, I never simply try to model “more detail”. It’s far more important that every change serves a function. A wrinkle should support the expression, a scar should tell a story, and an anatomical change should make the character more believable.
Traditional sculpting or digital character design?
Digital modelling has expanded the workflow of many studios. Programs like ZBrush make it possible to design characters digitally, adjust forms quickly and implement changes efficiently.
Nevertheless, digital sculpting does not automatically replace classic modelling techniques. Both approaches have their place and are often combined.
A digitally developed character can, for example, later be worked on further by hand or taken directly into the mould-making stage.
The choice of workflow always depends on the scope of the project, the schedule and personal working methods.
📷 Recommended image
vampire-prosthetics-sculpt.jpg
(Until dedicated ZBrush project images are available.)
📦 Common misconception
“Digital modelling replaces classic sculpting.”
Not necessarily.
Digital tools expand the possibilities but do not replace an understanding of anatomy, proportions and character design. Regardless of the workflow, these fundamentals remain decisive.
Skin structure and surface details
Before mould-making begins, the sculpt receives its final surface structure.
Here pores, fine skin wrinkles, transitions and other details are created that later contribute significantly to the believability of the finished prosthetic.
Especially in modern film productions with high-resolution cameras, even the smallest details can become visible. This step therefore carries great importance in the entire manufacturing process.
📷 Recommended image
knabe-mix-body-silicone-prosthetic-close.jpg
ALT text
Detail shot of the realistic skin structure of a professional silicone prosthetic.
Caption
Fig. 6: Fine skin details and natural surface structures contribute decisively to the later impact of a film prosthetic.
📌 Project example – Knabe Mix
On the Knabe Mix project, the challenge was to develop a believable ageing of the upper body that also holds up in close-ups. Already during character development, proportions, excess skin and the later mobility of the prosthetic had to be taken into account.
These decisions were not made at casting time, but were prepared during the sculpting and planning stages. As a result, the finished body prosthetic could later sit naturally on the body and blend harmoniously into the overall picture.
➡️ View project: Knabe Mix
From sculpt to finished film prosthetic
Once the character development is complete and the sculpt is finished, the most technically demanding section of the entire workflow begins. The goal of this phase is to transfer all the sculpted details as precisely as possible into a finished prosthetic, without losing form, surface structure or fit.
While the previous steps are mainly creative in nature, precision, material understanding and clean workflows now take centre stage.
Mould-making – the bridge between model and prosthetic
Mould-making forms the foundation of every high-quality film prosthetic. Its task is to transfer the finished sculpt into a mould from which the actual prosthetic can later be produced.
The demands on a mould differ considerably from project to project. Size, geometry, material choice and later demoulding influence the mould’s construction, as does the number of prosthetics required.
For more complex characters, multi-part moulds are often created so that all details can be reproduced cleanly and the finished prosthetic can be demoulded without damage.
In my daily work I mostly use materials from Smooth-On for mould-making, as they have proven themselves in many professional applications. Which materials are ultimately used, however, always depends on the requirements of the particular project.
📷 Recommended image
knabe-mix-body-prosthetic-mould.jpg
ALT text
Multi-part mould of a bespoke silicone body prosthetic during the manufacturing process.
Caption
Fig. 7: Mould-making transfers all the details of the sculpting onto the later film prosthetic.
💡 Practical tip from DoManh SFX
Clean mould-making often saves far more time later than it initially costs. Small inaccuracies in the mould accompany every single prosthetic produced from it.
Material choice – every project has different requirements
Once the mould is finished, the selection of the suitable material begins.
There is no universal solution here. A prosthetic for a commercial with close-ups has different requirements than a theatre production or a cosplay project.
The most important factors include:
desired flexibility
mobility of the body region
wearing time
camera distance
level of detail
production time
budget
These requirements ultimately determine which material system makes sense for the respective project.
📦 Project example
On the Knabe Mix project, the body prosthetic had to be large-area, flexible and at the same time camera-ready. Already during material selection, consideration was given to how the chest, belly and excess skin should later move naturally.
➡️ View project: Knabe Mix
Making the silicone prosthetic
After the mould-making is complete, the actual prosthetic is produced.
This is where the careful preparation of the previous steps proves its worth. Mould quality, material choice and processing now interlock directly.
For many of my projects I work mainly with PlatSil Gel systems, whose properties can be adapted to the respective requirements with the help of Deadener. This allows the flexibility of different body areas to be influenced in a targeted way.
Which material combination is ultimately used, however, always depends on the particular project and its requirements.
After casting, the prosthetic is carefully removed and prepared for the subsequent quality control.
📷 Recommended image
knabe-mix-body-prosthetic-bts.jpg
ALT text
Making a bespoke silicone body prosthetic in the workshop of DoManh SFX.
Caption
Fig. 8: During production, material properties and processing are carefully matched to the requirements of the project.
Quality control – every step is checked
Before a prosthetic is painted or applied, a thorough quality control takes place.
Among others, the following points are checked:
complete moulding
surface quality
material thickness
edge run
fit
any material flaws
Especially on productions with high-resolution cameras, even the smallest irregularities can become visible. Quality control is therefore not an optional step, but a fixed part of professional workflows.
📷 Recommended image
knabe-mix-body-silicone-prosthetic-close.jpg
ALT text
Close-up of a finished, cast and inspected silicone prosthetic.
Caption
Fig. 9: After demoulding, every prosthetic is carefully inspected before it is painted and applied.
Preparation for painting and application
After successful quality control, the prosthetic is prepared for its colour treatment.
Only now does the transition begin from the technical manufacturing process to the actual character transformation. Through painting, skin details and the later application, the neutral silicone form develops into an individual character.
This final section decisively determines how believable the prosthetic will later appear on camera.
📦 Did you know?
Even a technically perfectly made prosthetic often looks artificial without careful painting. Conversely, even an excellently painted prosthetic can lose its effect if the form or fit isn’t right. Only the interplay of all steps leads to a convincing result.
From workshop process to finished character transformation
The manufacturing process does not end with the finished silicone prosthetic. Only through careful painting, precise application and support during the production does the illusion of a believable character emerge.
Especially in modern film and commercial productions, the success of a character transformation is often decided not by the individual prosthetic, but by the interplay of all the steps.
Painting – the character gains its identity
After quality control, the colour treatment of the prosthetic begins.
The goal of painting is not simply to tint the silicone. Rather, various skin tones, transparencies and fine details are built up so that the prosthetic integrates as harmoniously as possible into the performer’s appearance.
Depending on the character, different features can be depicted, for example:
natural skin tones
fine veining
pigmentation
reddening
ageing features
injuries
dirt and weathering marks
The painting always follows the character’s story and the requirements of the respective production.
📷 Recommended image
knabe-mix-body-silicone-prosthetic-close.jpg
ALT text
Detail shot of a professionally painted silicone prosthetic with realistic skin structure.
Caption
Fig. 10: Through the colour treatment, the prosthetic gains its final effect and blends harmoniously into the skin.
💡 Practical tip from DoManh SFX
Ideally, good painting isn’t noticed by the viewer at all. It supports the effect of the prosthetic without pushing itself to the foreground. Subtle colour gradients and small details in particular often make the decisive difference.
The application – precision down to the smallest detail
Before the shoot, the finished prosthetic is applied to the performer.
Position, transitions and colour matching are carefully checked in the process. The goal is a seamless connection between prosthetic and natural skin, so that the character transformation is convincing even in close-ups.
Depending on the project, single or multiple prosthetic pieces can be combined. After application, further adjustments often follow until the prosthetic blends harmoniously into the overall picture.
📷 Recommended image
old-age-silicone-prosthetic-applying-close.jpg
ALT text
Application of a silicone prosthetic during a professional character transformation.
Caption
Fig. 11: Only precise application connects the prosthetic with the performer and makes the character believable.
On-set support – quality until the last shot
For many productions, the job does not end for the SFX artist with the finished application.
During filming, prosthetics are regularly checked and adjusted as needed. Depending on the shooting conditions, sweat, movement, long wearing times or weather can affect the adhesion points and colour.
Professional on-set support includes, among other things:
checking the transitions
minor repairs
colour corrections
re-gluing individual areas
continuity control between shots
Especially on multi-day productions, this support contributes significantly to keeping the character consistent throughout the entire shoot.
📷 Recommended image
alien-foamlatex-applying.jpg
ALT text
On-set support of a film prosthetic during a production.
Caption
Fig. 12: Prosthetics are regularly checked and adjusted as needed even during filming.
Film prosthetics are teamwork
Although many steps are closely linked to the prosthetic designer, a professional character transformation rarely comes about alone.
Depending on the size of the production, different departments work together – among them directing, costume, camera, lighting, hair, make-up and special effects. Close coordination ensures that all elements later form a coherent overall picture.
A successful film prosthetic is therefore always part of a larger creative process.
📦 Project example – Knabe Mix
On the Knabe Mix project, the character transformation was created in close collaboration with the production. From the first idea through the lifecast and the sculpting to the finished body prosthetic, all steps had to be coordinated so that the ageing of the character could be realised convincingly both creatively and technically.
➡️ View project: Knabe Mix